How to Install a Picture Hanging System: The Complete Step-by-Step Guide

Brushed silver heavy-duty gallery wall track for hanging heavy art without nails
 

1. How do I install a picture hanging system?

Installing a picture hanging system involves five main steps:
  1. Measure & Mark: Decide on your rail height and draw a level datum line across the wall using a spirit level.
  2. Mark Drill Points: Hold the mounting clips or tracks along your line and mark the fixing holes (typically spaced every 30cm to 50cm).
  3. Drill & Plug: Drill holes in your wall and insert the appropriate wall plugs (masonry plugs or plasterboard anchors).
  4. Fix the Clips: Screw the wall clips securely into place.
  5. Snap On the Rail: Press the aluminium rail onto the clips until it clicks securely into place, then insert your end caps, cables, and hooks.

2. Can I install a picture hanging system myself?

Yes, absolutely. Picture hanging systems are designed for straightforward DIY installation. If you can use a tape measure, a spirit level, and a power drill, you can fit a picture rail system yourself in under an hour. For longer wall runs, having a second person hold the rail while you mark makes the process even easier.

3. What tools do I need to install a picture hanging system?

You only need basic household DIY tools to install most gallery rails:
  • Spirit Level or Laser Level (essential for straight rails)
  • Tape Measure & Pencil
  • Power Drill with appropriate drill bits (masonry or wood/metal bit)
  • Screwdriver or Drill Driver Bit
  • Wall Fixings: Screws and wall plugs suited to your wall type
  • Hacksaw & Fine File (optional: only if cutting rails to custom lengths)

Heights, Positioning & Layout Guidelines

4. How high should a picture rail be installed?

A picture rail is typically installed flush against the ceiling line or directly above the top of windows and doors.
However, if you are hanging art using hanging cables and adjustable hooks, the rail position can be adjusted to suit your room’s architectural proportions:
  • Flush with Ceiling: Creates a seamless, near-invisible look that blends into the cornicing.
  • Eye-Level / Dado Height: Used in contemporary galleries or high-ceilinged spaces where you prefer a mid-wall installation rail.

5. How far below the ceiling should a picture hanging rail be fitted?

  • Ceiling-Mounted / Flush Tracks: Fitted 0mm to 5mm below the ceiling or coving for a fully integrated look.
  • Wall-Mounted Tracks: Typically fitted 10mm to 20mm below the ceiling or coving to allow enough clearance to clip the rail onto its mounting brackets easily.

Wall Types, Materials & Fixing Methods

6. Can a picture hanging system be installed without drilling into the wall?

For light-to-medium hanging needs, yes. You can use high-strength construction adhesives or heavy-duty mounting tape to attach aluminium tracks to smooth, painted surfaces.
Important Load Note: The strength of your wall paint or plaster surface strictly limits no-drill adhesive installations. For heavy artwork, mirrors, or high-value displays, mechanical screw fixings are always recommended.

7. Can I install a picture hanging system on plasterboard?

Yes. Picture hanging systems work exceptionally well on hollow stud walls and plasterboard (drywall).
When installing into plasterboard:
  • Use appropriate hollow wall anchors (such as metal self-drill plugs, Gripit fixings, or spring toggles).
  • Where possible, drive at least two screws directly into the underlying timber wall studs for maximum weight capacity.

8. Can I install a picture hanging system on a brick or concrete wall?

Yes. Brick, concrete, and masonry walls offer the highest weight capacity for gallery systems.
  1. Use a masonry drill bit with your drill’s hammer function turned on.
  2. Insert high-grade plastic wall plugs or heavy-duty expansion plugs flush with the brickwork.
  3. Drive your mounting clip screws securely into the plugs.

Modifying & Fitting Around Room Features

9. Can a picture rail be cut to size?

Yes. Aluminium picture hanging rails can easily be cut to fit any wall length using a standard fine-toothed hacksaw or a mitre saw fitted with an aluminium cutting blade.
Pro Tip: After sawing, use a small metal file or sandpaper to deburr the cut edges so the plastic end caps sit flush.

10. How do I install a picture hanging system around corners?

Picture hanging systems use specialised corner joiners to navigate room corners smoothly:
  • Internal Corners (90°): Butt two rails together in the corner and connect them using an internal corner connector or joiner cap to bridge the seam smoothly.
  • External Corners: Use an external corner joiner piece that covers the raw aluminium cut ends and keeps your hanging cables sliding smoothly around the turn.
  • Continuous Runs: For long straight walls requiring multiple lengths, use straight rail connectors inserted inside the back of the rails to keep the seam invisible and perfectly level.

The Ultimate Guide to Picture Hanging Systems: Types, Costs & Installation FAQ

Brushed silver heavy-duty gallery wall track for hanging heavy art without nails


1. What is the best picture hanging system?

The “best” system depends on your mounting needs and aesthetic preferences:
  • Best for Versatility & Zero Wall Damage: Picture Rail / Gallery Systems (like Artiteq). They use a top-mounted ceiling or wall track with suspended transparent perlon cords or stainless steel cables, allowing you to move, adjust, or swap artwork anytime without drilling new holes.
  • Best for Heavy Mirrors & Cabinets: Heavy-Duty Z-Bar Systems (French Cleats) (like Metalciti). Made from interlocking extruded aluminium, Z-bars anchor directly into wall studs to provide maximum stability for extra-heavy or oversized items.

2. How much does a picture hanging system cost?

The cost depends on system type, length, and weight capacity:
  • Basic DIY Track Kits (1–2 meters): Typically range from £20–£50, including basic rail, click connectors, cables, and standard hooks.
  • Heavy-Duty / Commercial Gallery Tracks: Cost approximately £30 to £100 per track segment, with professional heavy-duty hooks sold individually (£5–£15 each).
  • Z-Bar / French Cleat Rails: £10 to £35 per single length, depending on size (e.g., 300mm to 2000mm) and weight rating.

3. Which picture hanging system is best for heavy pictures?

For heavy art, mirrors, or large frames:
  • For Track Systems: Choose an Aluminium Gallery Rail with Stainless Steel Cables paired with heavy-duty auto-locking hooks (such as Zipper or Micro-Grip hooks), which can support up to 20kg (44lbs) per cable (or 40kg when using two cables per picture).
  • For Direct Wall Mounting: Use a heavy-duty aluminium Z-bar (French Cleat) system. Interlocking Z-bars distribute weight evenly across studs and can easily support 30kg to 100kg+ depending on length and fixings.

4. What is the difference between a picture rail and a picture hanging system?

  • Picture Rail: Refers specifically to the top track mounted horizontally along the ceiling line or wall header. In traditional homes, this was often a decorative wood moulding.
  • Picture Hanging System: Refers to the complete ecosystem, including the mounting track (rail), vertical drop cords/cables, slide connectors, and height-adjustable hooks attached to the artwork.

5. Are picture hanging systems worth it?

Yes. They are ideal for homeowners, renters, galleries, and commercial spaces because:
  • Zero Wall Repair: You drill wall anchors once to install the top track. After that, you never need to drill, nail, or patch drywall again when changing pictures.
  • Ultimate Flexibility: You can adjust the height, placement, or arrangement of your wall art in seconds.
  • Professional Finish: They provide a clean, museum-grade display while handling significantly higher weight capacities than adhesive strips or standard picture nails.

6. What should I look for when buying a picture hanging system?

Consider these key factors before purchasing:
  • Weight Capacity: Ensure both the rail and the hooks match or exceed the total weight of your heaviest artwork.
  • Mounting Location: Determine if you need a wall-mounted track, a ceiling-mounted track, or a hidden flush-mount Z-Bar system.
  • Cable Material: Choose transparent Perlon/Nylon cords for a nearly invisible look on lighter art, or braided Stainless Steel cables for industrial aesthetics and heavy loads.
  • Finish & Style: Check if the track comes in finishes like brushed aluminium, white, black, or a paintable primer to blend seamlessly with your walls.

7. What is included in a picture hanging kit?

A standard picture hanging track kit typically contains:
  • 1 x Aluminium Rail / Track (usually 1.5m or 2m in length)
  • Wall Fixings & Fasteners (screws, masonry/drywall plugs, and mounting clips)
  • 2 x Hanging Cords or Stainless Steel Cables (with cobra or twister heads)
  • 2 to 4 x Height-Adjustable Picture Hooks
  • End Caps & Track Connectors for a clean edge finish

8. How many hooks and cables do I need?

  • Small to Medium Pictures (under 5kg–10kg): 1 cable + 1 adjustable hook in the centre is usually sufficient for balanced frames under 40cm wide.
  • Large or Heavy Pictures (over 10kg): 2 cables + 2 adjustable hooks (one on the left side, one on the right side) to maintain perfect balance, distribute weight evenly, and keep the frame flat against the wall.
  • Vertical Gallery Stacks: You can thread multiple hooks onto a single cable to display pictures stacked on top of one another.

9. Where can I buy a picture hanging system?

Picture hanging systems are available through several retail channels:
  • Specialist Hardware Suppliers: Directly from specialised manufacturers and suppliers like Metalciti and Artiteq.
  • E-Commerce Marketplaces: Leading hardware storefronts on Amazon, eBay, and specialised framing supply websites.
  • Local Framing Shops & Home Centres: Select art galleries, framing stores, and major home improvement stores (e.g., Home Depot, Bunnings, B&Q).

10. Can I buy replacement hooks and cables separately?

Yes. All professional picture hanging systems feature modular designs. You can buy individual components separately at any time, including:
  • Extra Perlon or steel cables in varying lengths (1m to 3m+).
  • Additional self-locking or screw-lock hooks to expand your display.
  • Replacement end caps, rail connectors, and wall clips for re-installations.
 

Need help choosing the right system for your project?

Browse our range of Heavy-Duty Aluminium Z-Bars & Picture Hanging Systems or contact our technical sales team for custom sizing advice.

Why To Use Z Bar Hanging Systems

Z Bar Hanging Systems


In interior design and home décor, how you present artwork and decorative pieces plays a pivotal role in defining a space’s ambience and character. Whether you’re an art enthusiast, a homeowner with a penchant for stylish décor, or an interior designer seeking innovative solutions, METALCITI Z Bar Hanging Systems offer a versatile, elegant way to showcase your treasures with sophistication and ease.

The Evolution of Display Systems

Gone are the days of cumbersome nails, hooks, and wires. Traditional methods of hanging artwork often struggle with stability, adjustability, and aesthetic appeal. Enter the Z Bar Hanging System, a modern, sleek alternative that revolutionises how we exhibit art and décor.

What is a Z Bar Hanging System?

Z Bar Hanging Systems, also known as French Cleat Systems, consist of interlocking aluminium bars that provide a secure and level mounting solution for various items, including artwork, mirrors, shelves, and cabinets. The design includes two components: one affixed to the wall and the other to the object being hung, creating a stable, concealed mounting system.

Versatility and Adaptability

One of the most significant advantages of Z Bar Hanging Systems is their versatility. Unlike traditional hanging methods that limit placement options, Z Bar Systems allow easy adjustment and rearrangement of displayed items without additional hardware or wall repairs. This adaptability makes them ideal for residential, commercial, and gallery settings alike.

Seamless Aesthetic Integration

Beyond functionality, Z Bar Hanging Systems offer a seamless aesthetic integration that enhances rather than detracts from the displayed items. The slim profile of the aluminium bars creates a minimalist look, keeping the focus on the artwork or décor itself. Additionally, the concealed mounting mechanism provides a clean and polished finish, eliminating unsightly wires and hooks for a professional presentation.

Strength and Stability

Despite their minimalist design, Z Bar Hanging Systems are engineered for strength and stability. The interlocking configuration distributes weight evenly along the bars, preventing sagging or tilting over time. This robust construction keeps your precious items securely mounted, giving you peace of mind that they are safely showcased.

Easy Installation and Maintenance

Another hallmark of Z Bar Hanging Systems is their user-friendly installation process. With basic tools and hardware, mounting the system to the wall is straightforward and requires minimal effort. Once installed, maintenance is virtually nonexistent, making it a hassle-free solution for long-term display needs.

Endless Possibilities for Creativity

Whether you’re curating a gallery wall, designing a modern living space, or showcasing prized possessions, Z Bar Hanging Systems open up a world of creative possibilities. Mix and match artwork of varying sizes and styles, experiment with unconventional arrangements, or effortlessly rotate pieces to suit changing tastes and seasons.

Conclusion

In interior design, every detail matters. How we display artwork and décor shapes a space’s atmosphere and personality, so it’s essential to choose solutions that are both functional and aesthetically pleasing. With its versatility, seamless integration, strength, and ease of use, the Z Bar Hanging System stands out as a choice for elevating your space with sophistication and style. Say goodbye to outdated hanging methods and embrace a new era of display excellence with Z Bar Systems.

How to choose drywall screws for your project

How to choose drywall screws for your project

Are you planning to embark on a drywall project but feeling overwhelmed by the sheer variety of screws available? Look no further! In this ultimate guide, we will help you navigate the world of drywall screws and find the perfect ones for your project. Whether you’re a seasoned DIY enthusiast or a professional contractor, choosing the right screws is crucial for ensuring a sturdy and long-lasting installation. We understand that finding the perfect screws can be a daunting task, but fear not! Armed with our expert tips and insights, you’ll be able to make an informed decision and save yourself from costly mistakes. From understanding the different types and sizes of drywall screws to considering their materials and finishes, we’ve got you covered. So, let’s dive in and discover the secrets to selecting the perfect drywall screws that will make your project a resounding success!

Understanding the Different Types of Drywall Screws

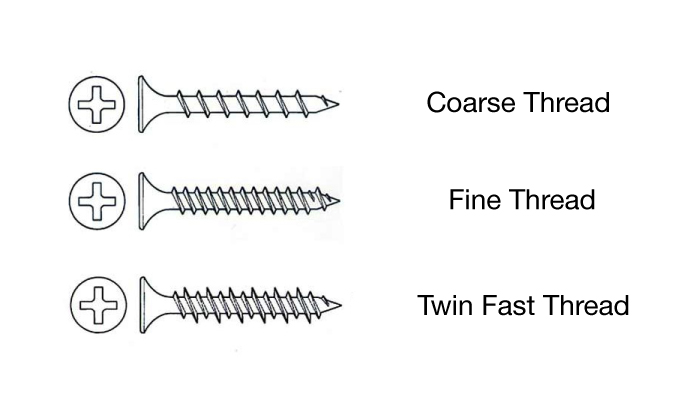
When it comes to drywall screws, it’s important to understand that not all screws are created equal. There are several different types, each designed for specific applications. Let’s take a closer look at the most common types of drywall screws:

1. Coarse Drywall Screws

These are the most commonly used screws for drywall installations. They feature a coarse thread that provides excellent grip and a sharp point for easy penetration into drywall panels.

2. Fine Thread Drywall Screws

As the name suggests, these screws have a finer thread compared to standard drywall screws. They are ideal for situations where a more secure fastening is required, such as attaching drywall to metal studs.

3. Twin Fast Drywall Screws

These screws are equipped with a self-drilling tip, eliminating the need for pre-drilling. They are commonly used when fastening drywall to wood or metal studs, as they can penetrate the material without the risk of splitting.

Now that you have a basic understanding of the different types of drywall screws, let’s move on to the factors you should consider when choosing the right screws for your project.

Factors to Consider When Choosing Drywall Screws

Selecting the right drywall screws involves considering several factors that can greatly impact the success of your project. Here are some key factors to keep in mind:

1. Length and Gauge of Drywall Screws

The length and gauge of the screws are crucial for ensuring a secure installation. The length of the screw should be sufficient to penetrate the drywall panel and provide enough grip into the underlying studs. As a general rule, a 3.5mm screw is suitable for 12.5mm drywall. The gauge of the screw refers to its thickness, with a lower gauge indicating a thicker screw. For most drywall installations, a #6 or #8 gauge screw will suffice.

2. Coating Options for Drywall Screws

Drywall screws are available in a variety of coatings, each offering different benefits. The most common coating options include black phosphate, zinc, and galvanized. Black phosphate screws are budget-friendly and provide basic corrosion resistance. Zinc-coated screws offer better corrosion resistance, making them suitable for areas with high humidity or moisture. Galvanised screws provide the highest level of corrosion resistance and are recommended for exterior installations or areas prone to moisture, such as bathrooms or kitchens.

3. Choosing the Right Head Type for Your Project

The head type of the screw determines how it sits flush with the surface of the drywall. The most common head types for drywall screws are Phillips and square drive. Phillips head screws are widely available and can be easily driven using a Phillips screwdriver or power drill. Square drive screws, on the other hand, have a square-shaped recess in their heads, which provides better torque transfer and reduces the likelihood of the screwdriver slipping.

Now that you have a better understanding of the factors to consider, let’s delve into the importance of using the correct screwdriver bit when working with drywall screws.

Importance of Using the Correct Screwdriver Bit

Using the correct screwdriver bit is crucial for ensuring a proper installation and preventing damage to the screw head. When working with drywall screws, it’s recommended to use a bit specifically designed for drywall screws, such as a drywall bit or a Phillips bit. These bits have a tapered shape that allows for easy insertion into the screw head and reduces the risk of stripping or camming out.

It’s important to note that using the wrong bit, such as a standard Phillips bit on a square drive screw, can lead to frustration and potentially damage the screw head. Investing in the right screwdriver bits will not only make your job easier but also ensure a professional-looking finish.

Common Mistakes to Avoid When Choosing Drywall Screws

While selecting drywall screws may seem straightforward, there are some common mistakes that can be easily avoided. Here are a few pitfalls to watch out for:

1. Using the Wrong Length or Gauge

Using screws that are too short or too long, or choosing a gauge that is incompatible with the drywall thickness, can compromise the stability of the installation.

2. Neglecting Coating Options

Failing to consider the environmental conditions of the installation area and choosing the wrong coating can lead to premature corrosion and damage.

3. Mixing Screw Head Types

Mixing different head types can cause difficulties during installation and result in an inconsistent appearance.

By being mindful of these mistakes, you can ensure a smooth and successful drywall installation.

Where to Buy High-Quality Drywall Screws

Now that you know what to look for in drywall screws, you might be wondering where to find high-quality options. Here are a few places to consider:

1. Hardware Stores

Local hardware stores often carry a wide range of drywall screws, allowing you to see and touch the products before making a purchase. Additionally, the staff at these stores can provide expert advice and recommendations based on your specific needs.

2. Online Retailers

Online retailers like Picture World offer a vast selection of drywall screws with the convenience of doorstep delivery. Make sure to read customer reviews and check the product specifications before placing your order.

3. Specialised Suppliers

If you’re working on a large-scale project or have specific requirements, consider reaching out to specialized suppliers who can offer a wider variety of drywall screws and provide custom solutions tailored to your needs.

Conclusion and Final Tips for Selecting the Perfect Drywall Screws

Choosing the perfect drywall screws doesn’t have to be a daunting task. By understanding the different types of screws, considering factors like length, gauge, coating, and head type, and using the correct screwdriver bit, you can ensure a successful installation. Additionally, avoiding common mistakes and purchasing high-quality screws from reputable sources will further enhance the durability and longevity of your project.

Remember, the right drywall screws are essential for achieving a professional finish and ensuring the stability of your installation. So, take the time to research, compare options, and make informed decisions. With the knowledge gained from this ultimate guide, you’ll be well-equipped to tackle your drywall project with confidence!

How to Unleash the Power of a Picture Hanging System

How to unleash the power of a picture hanging system


Welcome to the ultimate guide on creating a picture-perfect home! If you’re tired of crooked frames, unsightly holes in the walls, and the constant struggle of finding the perfect spot to hang your precious artwork, then you’re in the right place. In this comprehensive guide, we’ll unveil the secret to achieving a perfectly curated space with the help of a picture hanging system. Whether you’re an art enthusiast looking to showcase your collection or a homeowner wanting to add a touch of personality to your walls, we’ve got you covered. Say goodbye to the frustration of trial and error, as we walk you through the step-by-step process of selecting the right picture hanging system, measuring for perfect alignment, and ensuring secure and damage-free installation. Get ready to unleash the power of a picture hanging system  by ARTITEQ and transform your home into a captivating gallery that reflects your unique style and taste. Let’s dive in!

The Importance of a Picture Hanging System in Home Decor

When it comes to creating a picture-perfect home, the right picture hanging system is essential. Gone are the days of using nails, screws, and hooks that leave behind unsightly holes and damage your walls. A picture hanging system provides a versatile and flexible solution that allows you to easily hang, rearrange, and showcase your artwork without causing any damage. Not only does this save you from the headache of patching up holes and repainting, but it also gives you the freedom to experiment with different layouts and switch up your decor whenever inspiration strikes.

With a picture hanging system, you can create a cohesive and professional look throughout your home. Whether you have a single artwork or an extensive gallery, a picture hanging system ensures that your pieces are properly aligned and securely mounted. This not only enhances the visual impact of your artwork but also adds a sense of sophistication and elegance to your space. Plus, it eliminates the frustration of crooked frames and constantly readjusting your artwork.

Furthermore, a picture hanging system allows you to easily showcase your artwork at eye level, making it more accessible and engaging for viewers. By strategically placing your pieces at the right height and in the most flattering positions, you can create a focal point that draws attention and adds depth to your room. Whether you’re displaying a cherished family portrait, a breathtaking landscape, or a thought-provoking abstract piece, a picture hanging system ensures that your artwork takes centre stage and makes a lasting impression.

Advantages of Using a Picture Hanging System

Using a picture hanging system offers numerous advantages over traditional methods of hanging artwork. Here are some key benefits that make picture hanging systems a must-have for any home:

1. Versatility: Picture hanging systems are incredibly versatile, allowing you to hang artwork of various sizes, weights, and styles. Whether you have a small canvas, a large framed print, or an irregularly shaped sculpture, a picture hanging system can accommodate them all. With adjustable hooks and wires, you can easily adapt your display to suit your changing needs and preferences.

2. Ease of Use: Installing a picture hanging system is a breeze, even for those with minimal DIY skills. Most picture hanging systems come with clear instructions and all the necessary hardware, making the installation process quick and hassle-free. Once installed, hanging and rearranging your artwork becomes a simple task that requires no special tools or expertise.

3. Damage-Free: One of the biggest advantages of using a picture hanging system is that it is completely damage-free. Unlike nails or screws that leave permanent holes in your walls, picture hanging systems utilize tracks, rails, or rods that can be easily removed without leaving any marks. This is especially beneficial for renters or those who frequently change their decor, as it allows for a seamless transition from one style to another.

4. Flexibility: Picture hanging systems offer unparalleled flexibility when it comes to arranging and displaying your artwork. With the ability to easily move, adjust, and add or remove pieces, you have the freedom to experiment with different layouts and compositions. This flexibility allows you to create unique and dynamic displays that reflect your personal style and taste.

5. Protection: A picture hanging system not only protects your walls from damage but also safeguards your artwork from accidents and wear. With secure hooks and wires, you can rest assured that your precious pieces are safely mounted and won’t come crashing down. Additionally, some picture hanging systems come with features like anti-theft locks or UV-protected glass, providing extra security and preservation for your artwork.

By using a picture hanging system, you can enjoy these advantages and more, ensuring that your home is not only picture-perfect but also functional and convenient.

Types of Picture Hanging Systems

Now that you understand the importance and benefits of a picture hanging system, let’s explore the different types available. There are several types of picture hanging systems to choose from, each offering its own unique features and advantages. Here are the most common types:

1. Track Systems: Track systems consist of a horizontal rail that is mounted to the wall or ceiling. The rail features a groove or channel where you can attach hooks or wires to hang your artwork. Track systems are highly versatile and allow you to easily move and adjust your artwork along the rail. They are particularly popular in galleries and professional settings where frequent changes to the display are required.

2. Rod Systems: Rod systems utilise vertical rods that are attached to the wall or ceiling. These rods feature adjustable hooks or clamps that can be slid up and down to hang your artwork at different heights. Rod systems are ideal for creating a sleek and minimalist look, as they provide a clean and unobtrusive display. They are often used in modern or contemporary homes where a minimalist aesthetic is desired.

3. Cable Systems: Cable systems consist of thin stainless steel cables that are suspended from the ceiling or mounted to the wall. The cables are equipped with adjustable hooks or clamps that can be positioned at any desired height. Cable systems offer a sleek and modern look and are commonly used for hanging lightweight artwork or signage. They are especially popular in retail or commercial spaces where frequent changes to the display are necessary.

4. Gallery Systems: Gallery systems are a comprehensive solution that combines tracks, rods, cables, and hooks to create a versatile and customisable display. These systems are designed specifically for art galleries, museums, or spaces that require a professional and high-quality presentation. Gallery systems offer the utmost flexibility and precision, allowing you to create intricate and sophisticated displays.

When choosing the right picture hanging system for your home, consider factors such as the weight and size of your artwork, the desired aesthetic, and the level of flexibility you require. Each type of system has its own strengths and suitability for different spaces and needs. Take the time to evaluate your options and select the system that best aligns with your preferences and requirements.

How to Choose the Right Picture Hanging System for Your Home

Selecting the right picture hanging system for your home is crucial to achieving the desired look and functionality. Here are some key considerations to keep in mind when choosing a picture hanging system:

1. Weight Capacity: Before purchasing a picture hanging system, determine the weight of your heaviest artwork. It’s essential to choose a system that can support the weight of your pieces to ensure they are securely hung. Different systems have varying weight capacities, so be sure to check the specifications provided by ARTITEQ.

2. Size and Style: Consider the size and style of your artwork when selecting a picture hanging system. Some systems may be better suited for small or lightweight pieces, while others are designed to handle larger or heavier works. Additionally, think about the aesthetic you want to achieve. Do you prefer a sleek and minimalist look, or do you want a more traditional and decorative system? Choose a system that complements your artwork and enhances your overall decor.

3. Flexibility: Determine how often you plan to rearrange or change your artwork. If you like to frequently update your display, opt for a system that offers easy adjustability and versatility. Look for systems that allow you to effortlessly move, add, or remove artwork without any hassle.

4. Installation: Consider your DIY skills and the complexity of installation when choosing a picture hanging system. Some systems require professional installation, while others can be easily installed by homeowners. If you’re not comfortable with DIY projects, it’s best to choose a system that offers simple and straightforward installation.

5. Budget: Picture hanging systems come in a range of prices, so it’s important to establish a budget before making a purchase. Keep in mind that quality systems may be more expensive but offer better durability, flexibility, and functionality. Consider the long-term value and benefits of the system rather than solely focusing on the upfront cost.

By carefully considering these factors, you can choose a picture hanging system that perfectly meets your needs and allows you to create the picture-perfect home you’ve always dreamed of.

Step-by-Step Guide to Installing a Picture Hanging System

Now that you have selected the right picture hanging system for your home, it’s time to install it. Follow this step-by-step guide for a seamless installation process:

1. Gather the necessary tools: Before you begin, make sure you have all the tools and hardware required for installation. This typically includes a drill, screws, wall anchors (if needed), a measuring tape, a level, and a pencil.

2. Measure and mark: Determine the desired height and position for your picture hanging system. Use a measuring tape and a pencil to mark the spots where the rails, rods, or cables will be installed. Make sure the marks are level and evenly spaced.

3. Prep the walls: If necessary, use a stud finder to locate the studs in your walls. This will ensure that your picture hanging system is securely anchored. If there are no studs in the desired location, use wall anchors to provide additional support.

4. Install the rails, rods, or cables: Following the manufacturer’s instructions, install the rails, rods, or cables according to your chosen picture hanging system. Use a drill and screws to secure them to the wall or ceiling, ensuring they are level and firmly attached.

5. Attach the hooks or clamps: Once the main components are installed, attach the hooks or clamps to the rails, rods, or cables. Make sure they are properly aligned and securely fastened. Test the stability of the hooks or clamps by gently tugging on them.

6. Hang your artwork: Finally, it’s time to hang your artwork! Use the adjustable hooks or clamps to position your pieces at the desired height and spacing. Make any necessary adjustments to ensure your artwork is level and perfectly aligned.

By following these steps, you can confidently install your picture hanging system and begin showcasing your artwork in a professional and visually appealing manner.

Tips for Arranging and Displaying Pictures Using a Picture Hanging System

Now that your picture hanging system is installed, it’s time to unleash your creativity and start arranging your artwork. Here are some tips to help you create a visually stunning and cohesive display:

1. Plan your layout: Before you start hanging your artwork, take some time to plan your layout. Consider the size, shape, and color of your pieces, as well as the available wall space. Experiment with different arrangements by laying out your artwork on the floor or using painter’s tape to mark the positions on the wall.

2. Create a focal point: Select one or two pieces to serve as focal points in each room. These pieces should be larger, more eye-catching, or hold sentimental value. By strategically placing your focal point(s) at eye level, you create a visual anchor that draws attention and sets the tone for the entire display.

3. Mix and match: Don’t be afraid to mix different types of artwork, such as paintings, photographs, prints, or sculptures. Combining different mediums and styles adds visual interest and depth to your display. Experiment with contrasting colors, textures, and sizes to create a dynamic and eclectic arrangement.

4. Consider scale and proportion: When arranging your artwork, pay attention to scale and proportion. Balance larger pieces with smaller ones to create harmony and prevent your display from looking cluttered or unbalanced. If you have a large empty wall, consider creating a gallery wall by grouping smaller pieces together for a visually impactful statement.

5. Experiment with spacing: The spacing between each artwork is crucial for creating a cohesive and visually pleasing display. Aim for consistent spacing between pieces, whether it’s a few inches or several feet, depending on the size and style of your artwork. Consider using a level or measuring tape to ensure consistent spacing throughout your display.

6. Add depth and dimension: To add depth and dimension to your display, incorporate elements such as shelves, ledges, or shadow boxes. These can be used to display three-dimensional artwork, small objects, or plants, adding visual interest and variety to your arrangement.

7. Consider lighting: Proper lighting is essential for showcasing your artwork. Install adjustable spotlights or picture lights to highlight your pieces and create a dramatic effect. Pay attention to the direction and intensity of the light to avoid glare or shadows that may detract from the artwork.

By following these tips, you can create a visually stunning and personalized display that showcases your artwork to its fullest potential. Let your creativity run wild and have fun experimenting with different arrangements until you find the perfect one for your space.

How To Choose the Right Wood Screw for Your DIY Project


Are you tired of your DIY projects falling apart because you didn’t choose the right wood screw? Look no further! We’ve got you covered with the ultimate guide to selecting the perfect wood screw for all your woodworking endeavors. Whether you’re a seasoned craftsman or just starting out, understanding the different types of wood screws and their specific uses is essential for ensuring the longevity and stability of your creations. In this comprehensive guide, we’ll walk you through the various factors to consider when choosing a wood screw, including size, material, thread type, and head style. You’ll learn how to match the screw to the type of wood, the load-bearing requirements, and the specific project at hand. Say goodbye to stripped screws and weak joints! With our expert advice, you’ll be equipped with the knowledge and confidence to tackle any woodworking project with ease and precision. Get ready to take your DIY game to the next level!

Different types of wood screws

Wood screws come in a variety of types, each designed for specific applications. Understanding the different types will help you choose the right screw for your project.

1. Traditional wood screws

Traditional wood screws are the most commonly used type of screw in woodworking projects. They have a tapered shank and a sharp point, making them easy to drive into wood. These screws are available in various lengths and diameters, making them suitable for a wide range of applications.

2. Chipboard screws

Chipboard screws are specifically designed for use with chipboard, particleboard, and other engineered wood materials. They have a coarse thread that provides excellent grip, ensuring a strong and secure connection. These screws often feature a sharp point for easy penetration.

3. Deck screws

Deck screws are designed for outdoor applications, such as building decks and fences. They are made of corrosion-resistant materials, such as stainless steel or coated steel, to withstand exposure to moisture and harsh weather conditions. Deck screws have a special thread design that helps prevent wood from splitting.

Understanding screw sizes and measurements

Choosing the right screw size is crucial for achieving a secure and stable connection. Screws are typically measured by their length and diameter. Understanding these measurements will help you select the appropriate screw for your project.

1. Length

The length of a screw refers to the distance from the tip to the head. It is important to choose a screw that is long enough to penetrate both pieces of wood being joined together. A screw that is too short may not provide sufficient holding power, while a screw that is too long can damage the wood or protrude through the surface.

2. Diameter

The diameter of a screw is measured at its widest point, which is typically the outer edge of the threads. Screws with larger diameters have a higher load-bearing capacity and are suitable for heavy-duty applications. Smaller diameter screws are better suited for lighter projects.

Factors to consider when choosing wood screws

When selecting wood screws, several factors should be taken into account to ensure optimal performance and longevity. These factors include the type of wood, load-bearing requirements, and project-specific considerations.

1. Type of wood

Different types of wood have varying densities and characteristics, which can affect the choice of screw. Softwoods, such as pine and cedar, require screws with a coarser thread to provide sufficient grip. Hardwoods, like oak and maple, may require screws with a finer thread to prevent splitting.

2. Load-bearing requirements

Consider the weight and stress that will be placed on the joint. For heavy-duty applications, it is important to choose screws with a higher load-bearing capacity. Screws with a larger diameter and longer length are generally stronger and more resistant to bending or breaking.

3. Project-specific considerations

The specific requirements of your project should also be taken into consideration. If you’re joining thin pieces of wood, choose screws with a shorter length to avoid protruding through the other side. For projects where aesthetics are important, consider using screws with a flush or countersunk head to create a seamless finish.

Choosing the right screw head type

The screw head type plays a crucial role in the overall appearance and functionality of your project. Different screw head types offer varying levels of visibility and ease of use.

1. Flathead screws

Flathead screws have a countersunk head that sits flush with the surface of the wood when fully driven. They are commonly used in applications where a flush finish is desired, such as furniture assembly. Flathead screws can be driven using a flathead screwdriver or a power drill with a compatible bit.

2. Phillips-head screws

Phillips-head screws have a cross-shaped indentation on the head. They are one of the most common types of screw heads and can be driven using a Phillips screwdriver. Phillips-head screws provide good torque transfer and are suitable for a wide range of applications.

3. Square-drive screws

Square-drive screws have a square-shaped indentation on the head. This type of screw head offers increased torque transfer and reduced risk of cam-out (slipping of the screwdriver). Square-drive screws are commonly used in woodworking and are compatible with square-drive screwdrivers and power drill bits.

Selecting the appropriate screw material

The choice of screw material is crucial for determining its durability, corrosion resistance, and suitability for different applications. Various materials are available, each with its own set of advantages and disadvantages.

1. Steel screws

Steel screws are the most common and cost-effective option. They provide good strength and are suitable for most indoor applications. However, steel screws are prone to rust and corrosion when exposed to moisture or harsh environments.

2. Stainless steel screws

Stainless steel screws are highly corrosion-resistant and suitable for outdoor and marine applications. They are more expensive than steel screws but offer superior durability and longevity. Stainless steel screws are available in different grades, each with varying levels of corrosion resistance.

3. Brass screws

Brass screws are known for their attractive appearance and resistance to corrosion. They are often used in decorative woodworking projects or applications where aesthetics are important. Brass screws are softer than steel, so they may not be suitable for heavy-duty applications.

Determining the correct screw length and diameter

Choosing the correct screw length and diameter is essential for achieving a secure and stable connection. Using screws that are too short or too long can compromise the integrity of the joint.

1. Screw length

The length of the screw should be sufficient to penetrate both pieces of wood being joined. As a general rule, the screw should be at least 1.5 times the thickness of the thickest piece of wood. If the screw is too short, it may not provide enough holding power. If it is too long, it can damage the wood or protrude through the surface.

2. Screw diameter

The diameter of the screw should be chosen based on the load-bearing requirements of the joint. Larger diameter screws provide greater strength and are suitable for heavy-duty applications. Smaller diameter screws are better suited for lighter projects.

Tips for driving and securing wood screws

Properly driving and securing wood screws is crucial for achieving a strong and secure connection. Here are some tips to ensure successful screw installation:

1. Pre-drilling

For hardwoods or when working near the edge of a board, pre-drilling pilot holes can prevent the wood from splitting. Use a drill bit that is slightly smaller than the diameter of the screw to create the pilot hole.

2. Countersinking

If using flathead screws, countersink the holes to allow the screw heads to sit flush with the surface of the wood. This creates a seamless finish and minimizes the risk of snagging or splintering.

3. Applying pressure

When driving the screw, apply firm and steady pressure to ensure proper penetration. Avoid over-tightening, as this can strip the screw or damage the wood.

4. Using a screwdriver or power drill

Choose the appropriate tool for driving the screws. A screwdriver provides better control and precision for smaller projects, while a power drill can speed up the installation process for larger or repetitive tasks.

Common mistakes to avoid when using wood screws

To ensure successful woodworking projects, it is important to avoid common mistakes that can compromise the integrity of the joints. Here are some mistakes to watch out for:

1. Using the wrong size or type of screw

Using screws that are too short, too long, or of the wrong type can result in weak joints or damaged wood. Always choose the appropriate screw size and type for your specific project.

2. Over-tightening screws

Over-tightening screws can strip the screw threads, weaken the joint, or damage the wood. Use firm and steady pressure, and stop tightening when the screw is snug.

3. Not pre-drilling pilot holes

Failing to pre-drill pilot holes can lead to split wood, especially when working with hardwoods or near the edges of boards. Take the time to create pilot holes for a stronger and more secure connection.

4. Neglecting to countersink holes

If using flathead screws, neglecting to countersink the holes can result in protruding screw heads that can snag or splinter. Always countersink the holes to achieve a seamless finish.

Conclusion

Choosing the right wood screw is essential for the success of your woodworking projects. By understanding the different types of wood screws, their sizes, materials, and head styles, you can ensure strong and secure joints that will stand the test of time. Remember to consider factors such as the type of wood, load-bearing requirements, and project-specific considerations when selecting screws. By following our tips for driving and securing wood screws and avoiding common mistakes, you’ll be well-equipped to tackle any DIY project with confidence. So go ahead, take your woodworking skills to the next level, and create beautiful, durable, and functional pieces that will be admired for years to come!

Why Hanging Systems are Essential for Modern Universities

Why Hanging Systems are Essential for Modern Universities


Transforming Learning Environments

In the fast-paced digital age, the way we learn and engage with educational content has undergone a remarkable transformation. Modern universities are no longer confined to traditional classrooms and lecture halls; instead, they strive to create dynamic and interactive learning environments that foster collaboration and creativity. In this rapidly changing landscape, hanging systems have emerged as an essential tool for universities looking to optimize their spaces and enhance the learning experience. These innovative systems not only provide versatility and flexibility in displaying educational materials, but they also serve as a visual representation of a university’s commitment to adaptability and innovation. In this article, we will explore the various benefits of hanging systems in transforming learning environments and how they can revolutionize the way students and educators interact with information. Whether it’s showcasing artwork, displaying study aids, or creating immersive multimedia presentations, hanging systems are the future of education, enabling universities to create spaces that inspire and empower learners.

The Importance of Creating Adaptable Learning Environments

Creating adaptable learning environments is crucial in today’s ever-changing educational landscape. Traditional classrooms with fixed desks and static displays limit the potential for collaboration, creativity, and engagement. Students need spaces that can be easily transformed to suit different learning activities and teaching methods. This is where hanging systems come into play.

Hanging systems allow universities to maximize the use of their spaces by providing flexible solutions for displaying educational materials. With these systems, walls become dynamic canvases that can be customized to meet the specific needs of each learning session. Whether it’s rearranging artwork, showcasing project presentations, or displaying study aids, hanging systems enable universities to create adaptable learning environments that cater to the diverse needs of students and educators.

Moreover, adaptable learning environments promote a sense of ownership and empowerment among students. When they have the freedom to personalise their learning spaces, students feel more engaged and motivated to actively participate in their education. This sense of ownership also extends to educators, who can easily transform a traditional classroom into an interactive learning hub that fosters collaboration and creativity.

Benefits of Using Hanging Systems in Universities

Hanging systems offer a myriad of benefits for universities looking to transform their learning environments. Let’s explore some of the key advantages:

1. Versatility and Flexibility

Hanging systems provide universities with the flexibility to adapt their spaces to various learning activities and teaching methods. These systems allow for easy rearrangement of displays, enabling educators to create different learning zones within a single space. Whether it’s a collaborative brainstorming area, a presentation corner, or an interactive multimedia station, hanging systems empower universities to optimize their spaces for maximum engagement and productivity.

2. Enhanced Visual Appeal

Hanging systems not only serve a functional purpose but also enhance the visual appeal of learning environments. By displaying artwork, infographics, or educational posters, universities can create visually stimulating spaces that inspire and motivate learners. The ability to showcase student projects and achievements also encourages a sense of pride and accomplishment among students.

3. Improved Accessibility and Organisation

Hanging systems provide a practical solution for organizing and displaying educational materials. Instead of cluttering desks or relying on limited wall space, universities can utilize hanging systems to keep study aids, reference materials, and visual resources easily accessible. This improves the overall organization and efficiency of the learning environment, allowing students to focus on their studies without distractions.

Case Studies of Universities that have Successfully Implemented Hanging Systems

To understand the real impact of hanging systems on learning environments, let’s take a look at a few case studies of universities that have successfully implemented these innovative solutions.

1. Birmingham University

Birmingham University recently integrated hanging systems into their newly renovated classrooms. By using magnetic hanging systems, they were able to create versatile display areas that allowed for easy rearrangement of study aids, posters, and artwork. The students and educators at Birmingham University reported increased engagement and collaboration, as the hanging systems provided a visually appealing and organised environment that encouraged active participation in the learning process.

2. Cambridge University

Cambridge University recognized the need for adaptable learning spaces and implemented hanging systems throughout their campus. They chose hanging systems with adjustable hooks and panels, allowing for quick and effortless customization of their learning environments. This flexibility enabled educators to create different learning zones based on the specific needs of each class, promoting collaboration, creativity, and knowledge retention.

3. York University

York University took a unique approach by integrating digital hanging systems in their classrooms. These systems featured interactive touchscreens that allowed students to collaborate on digital projects and presentations. The hanging systems also provided wireless connectivity, enabling seamless integration with other educational technologies. This innovative implementation of hanging systems transformed York University’s learning environments into immersive and interactive spaces that facilitated active learning and knowledge sharing.

Key Features to Consider When Choosing a Hanging System for Universities

When selecting a hanging system for a university, it’s essential to consider certain key features that align with the institution’s specific needs and goals. Here are some factors to keep in mind:

1. Versatility and Customisation Options

Look for hanging systems that offer versatility and customization options to cater to different learning activities and teaching methods. Adjustable hooks, magnetic panels, or interactive touchscreens can provide the flexibility needed to create adaptable learning environments.

2. Durability and Safety

Ensure that the hanging system is durable and can withstand the demands of a university setting. The system should be able to hold various types of educational materials securely without compromising safety. Look for features such as reinforced hooks, sturdy frames, and reliable installation methods.

3. Integration with Technology

Consider how the hanging system can integrate with other educational technologies. For example, if the university utilizes digital resources or interactive displays, choose a hanging system that supports wireless connectivity, touchscreen compatibility, or other technology integration features.

4. Ease of Installation and Maintenance

Choose a hanging system that is easy to install and maintain. Look for systems that offer simple installation methods, clear instructions, and minimal hardware requirements. Additionally, consider the ease of cleaning and replacing displays or materials within the system.

How Hanging Systems Promote Collaboration and Creativity in Classrooms

Hanging systems play a crucial role in promoting collaboration and creativity in modern classrooms. By providing adaptable and visually appealing spaces, these systems encourage students to actively engage with their peers and educators. Here’s how hanging systems facilitate collaboration and creativity:

1. Encouraging Group Work

Hanging systems enable educators to create collaborative spaces where students can work together on projects, presentations, or group discussions. By providing designated areas for teamwork, hanging systems promote effective communication, problem-solving, and critical thinking skills.

2. Inspiring Creativity

The visual appeal of hanging systems stimulates creativity among students. Whether it’s displaying artwork, showcasing student projects, or presenting multimedia content, these systems inspire learners to think outside the box and explore innovative ideas. The ability to easily change the displays also allows students to showcase their creativity and express their individuality.

3. Facilitating Knowledge Sharing

Hanging systems serve as a platform for knowledge sharing within the classroom. By displaying informative posters, infographics, or reference materials, educators can create visual aids that support their lessons. This visual reinforcement enhances students’ understanding and retention of information, promoting a more interactive and effective learning experience.

Examples of Innovative Hanging System Designs in Modern Universities

As universities embrace hanging systems to transform their learning environments, innovative designs have emerged to cater to the unique needs of modern education. Let’s explore some examples of these designs:

1. Modular Hanging Systems

Modular hanging systems consist of interchangeable panels that can be easily rearranged to create different learning zones. These systems offer flexibility and adaptability, allowing educators to customize their classrooms based on the specific needs of each class. The modular design also enables universities to expand or reconfigure their spaces as required.

2. Digital Interactive Hanging Systems

Digital interactive hanging systems combine the benefits of traditional hanging systems with advanced technology. These systems feature interactive touchscreens that enable students to collaborate on digital projects, access online resources, or engage with multimedia content. The integration of technology enhances the learning experience by providing interactive and immersive opportunities for students.

3. Mobile Hanging Systems

Mobile hanging systems offer the ultimate flexibility in learning environments. These systems are equipped with wheels or casters, allowing educators to easily move them to different areas of the classroom or even between classrooms. Mobile hanging systems are particularly useful for collaborative activities, presentations, or events that require temporary display setups.

Tips for Integrating Hanging Systems Seamlessly into Existing Learning Environments

Integrating hanging systems seamlessly into existing learning environments requires careful planning and execution. Here are some tips to ensure a smooth transition:

1. Assess the Space

Before installing hanging systems, assess the available space and identify the areas that would benefit the most from these systems. Consider the layout, traffic flow, and functionality of the space to determine the most suitable locations for hanging displays.

2. Involve Educators and Students

Involve educators and students in the decision-making process to gain insights into their specific needs and preferences. By considering their input, universities can ensure that the hanging systems align with the teaching methods and learning styles practiced within their institution.

3. Provide Training and Support

Offer training sessions to educators and students on how to effectively utilize the hanging systems. Provide guidance on rearranging displays, replacing materials, and maintaining the system. Ongoing support is crucial to maximise the benefits of the hanging systems and ensure they’re effective use in the long term.

4. Regularly Evaluate and Adapt

Regularly evaluate the usage and effectiveness of the hanging systems to identify areas for improvement. Seek feedback from educators and students to understand how the systems are impacting their learning experience. Use this feedback to adapt and refine the implementation of hanging systems as needed.

The Role of Technology in Enhancing Hanging Systems in Universities

Technology plays a significant role in enhancing hanging systems in universities. Advancements in digital displays, connectivity, and interactive features have revolutionized the capabilities of hanging systems. Here are some ways in which technology enhances hanging systems:

1. Digital Displays

Digital displays offer universities the opportunity to showcase multimedia content, engage students with interactive lessons, and provide real-time information updates. These displays can be seamlessly integrated into hanging systems, providing a dynamic and immersive learning experience.

2. Wireless Connectivity

Wireless connectivity enables universities to connect hanging systems to other educational technologies, such as projectors, interactive whiteboards, or student devices. This integration allows for seamless sharing of content, collaboration, and interactive learning experiences.

3. Touchscreen Capabilities

Touchscreen capabilities open up a whole new realm of possibilities for hanging systems. Students can interact directly with the displays, annotate content, and collaborate on digital projects. Touchscreen hanging systems promote engagement, interactivity, and a more personalized learning experience.

4. Data Analytics

Advanced hanging systems equipped with data analytics capabilities can provide valuable insights into students’ engagement, preferences, and learning patterns. This data can help educators tailor their teaching methods and track the effectiveness of different learning activities.

Conclusion: Embracing the Future of Learning with Hanging Systems

Hanging systems have become an essential tool for modern universities looking to transform their learning environments. These innovative systems provide versatility, flexibility, and enhanced visual appeal, fostering collaboration, creativity, and engagement among students and educators. By showcasing artwork, displaying study aids, or creating immersive multimedia presentations, hanging systems revolutionize the way information is presented and interacted with.

As universities strive to adapt to the ever-changing educational landscape, embracing hanging systems is key to creating adaptable, dynamic, and interactive learning environments. By choosing the right hanging system, integrating technology, and involving stakeholders in the process, universities can empower learners, inspire creativity, and optimize their spaces for maximum engagement and productivity. The future of learning starts with hanging systems, enabling universities to create spaces that inspire and empower learners in the digital age.


The Ultimate Guide to Picture Rail Hooks

The ultimate guide to picture rail hooks

How to Hang Artwork with Style and Ease

If you’ve ever struggled with hanging artwork or felt limited by traditional methods, picture rail hooks are about to become your new best friend. These handy little hooks not only make the task of hanging art a breeze, but they also add a touch of style and elegance to any space. Whether you’re a seasoned art collector or just a fan of beautifully displayed pieces, this guide will equip you with everything you need to know about using picture rail hooks effectively. From choosing the right hooks for your walls to mastering the art of positioning and arranging your artwork, we’ve got you covered. Say goodbye to unsightly nail holes and hello to a gallery-worthy display that will leave your guests in awe. So, let’s dive in and discover the secrets to hanging artwork with style and ease using picture rail hooks!

Why use picture rail hooks?

When it comes to hanging artwork, traditional methods often involve hammering nails directly into the wall. Not only does this leave unsightly holes that are difficult to fix, but it also limits your options for arranging and rearranging your art. Picture rail hooks offer a more flexible and stylish alternative. These hooks are mounted on a picture rail, which is a horizontal strip of molding installed near the ceiling. By hanging your artwork from the rail, you can easily adjust the height and position of each piece without damaging your walls. Picture rail hooks also distribute the weight of the artwork more evenly, reducing the risk of damage or accidents. So, whether you’re renting a space or simply want the freedom to change your art display whenever you like, picture rail hooks are the perfect solution.

There are several advantages to using picture rail hooks. Firstly, they allow you to hang artwork without damaging your walls. This is particularly beneficial for those who are renting or living in spaces where drilling into the walls is not allowed. Picture rail hooks eliminate the need for nails or screws, providing a non-invasive hanging method. Additionally, picture rail hooks give you the flexibility to easily adjust the height and position of your artwork. This is especially useful when you want to experiment with different arrangements or change the display over time. Lastly, picture rail hooks add a touch of elegance and sophistication to any space. They create a gallery-like atmosphere and draw attention to your artwork, enhancing the overall aesthetic appeal of your home.

Different types of picture rail hooks

Before you start hanging your artwork with picture rail hooks, it’s important to understand the different types available. There are various styles and designs to choose from, each with its own unique features and benefits. Here are some of the most common types of picture rail hooks:

1. Traditional hooks: These are the most basic and widely used picture rail hooks. They have a simple design with a hook at one end and a slot at the other. The hook is used to hang the wire or cord attached to the artwork, while the slot slides onto the picture rail. Traditional hooks are available in different sizes and weight capacities, so make sure to choose the right ones based on the size and weight of your artwork.

2. Adjustable hooks: If you’re looking for more flexibility in terms of height and positioning, adjustable hooks are a great option. These hooks feature a mechanism that allows you to slide the hook up or down along the length of the picture rail. This means you can easily adjust the height of your artwork without having to remove the hook from the rail. Adjustable hooks are especially useful when you want to create a dynamic and visually interesting art display.

3. Gallery hooks: Gallery hooks are designed to hold heavier and larger artworks. They have a sturdier construction and can support more weight compared to traditional hooks. Gallery hooks often come with additional features like locking mechanisms or adjustable grips to ensure that your artwork stays securely in place. If you have larger or heavier pieces of art, consider using gallery hooks for added stability and security.

4. Specialty hooks: In addition to the standard options, there are also specialty hooks available for specific needs. For example, there are hooks designed for hanging mirrors, plates, or other decorative items. These hooks often have unique designs or features that cater to the specific requirements of the item being hung. If you have any special hanging needs, be sure to explore the range of specialty hooks available.

When choosing picture rail hooks, it’s important to consider the weight and size of your artwork, as well as the style and design of the hooks. Make sure to read the product descriptions and specifications to ensure that the hooks you choose are suitable for your specific needs. It’s also a good idea to purchase extra hooks in case you want to add more artwork to your collection in the future. With the right picture rail hooks, you can create a stunning art display that showcases your personal style and enhances the overall ambiance of your space.

How to choose the right picture rail hooks for your space

Choosing the right picture rail hooks for your space is essential to ensure that your artwork is securely and safely displayed. Here are some factors to consider when selecting picture rail hooks:


1. Weight capacity: The weight capacity of the hooks is an important consideration, especially if you have larger or heavier artworks. Make sure to check the weight limit specified by the manufacturer and choose hooks that can comfortably support the weight of your artwork. It’s always better to err on the side of caution and choose hooks with a higher weight capacity than necessary.

2. Wall material: The type of wall material in your space can also affect the choice of picture rail hooks. If you have plaster walls, for example, you may need hooks that are specifically designed for this type of surface. Some hooks come with special features or attachments that are suitable for different wall materials. Be sure to read the product descriptions and choose hooks that are compatible with your wall type.

3. Aesthetic appeal: Picture rail hooks come in various designs and finishes, so consider the overall aesthetic of your space when choosing hooks. Opt for hooks that complement the style and decor of your room. Whether you prefer modern, minimalist, or vintage-inspired hooks, there are plenty of options available to suit your taste. The right hooks can enhance the visual appeal of your artwork and create a cohesive and stylish look.

4. Ease of installation: Consider how easy it is to install the picture rail hooks. Some hooks require additional tools or hardware for installation, while others can be easily mounted with adhesive strips or screws. Choose hooks that align with your preferred method of installation and ensure that you have the necessary tools and materials on hand.

By taking these factors into account, you can select picture rail hooks that not only meet your functional requirements but also enhance the aesthetic appeal of your space. The right hooks will provide a sturdy and secure hanging solution, allowing you to showcase your artwork with confidence.br/>

Tools and materials needed for hanging artwork with picture rail hooks

Before you start hanging your artwork with picture rail hooks, it’s important to gather the necessary tools and materials. Here’s a list of what you’ll need:

1. Picture rail hooks: Choose the appropriate hooks based on the weight and size of your artwork, as well as the design and style of your space.

2. Picture hanging wire or cord: Use a strong and durable wire or cord that can support the weight of your artwork. Make sure to measure and cut the wire or cord to the desired length.

3. Pliers: Pliers will be needed to twist and secure the wire or cord onto the picture rail hooks. Choose pliers with a comfortable grip and a strong, sturdy construction.

4. Level: A level is essential for ensuring that your artwork is hung straight and aligned. Use a bubble or laser level to achieve accurate results.

5. Measuring tape: Use a measuring tape to determine the desired height and spacing between each artwork. This will help you create a balanced and visually appealing art arrangement.

6. Pencil: A pencil is useful for marking the desired hanging points on the wall or picture rail.

7. Hammer or adhesive strips: Depending on the type of picture rail hooks you’re using, you may need a hammer or adhesive strips for installation. Traditional hooks may require a hammer to secure them onto the picture rail, while adhesive strips can be used for hooks that don’t require nails or screws.

8. Optional: If you have larger or heavier artworks, you may also need additional support in the form of wall anchors, screws, or brackets. Check the manufacturer’s instructions or consult a professional if you’re unsure about the additional support needed for your specific artwork.

Once you have gathered all the necessary tools and materials, you’re ready to start hanging your artwork with picture rail hooks. Follow the step-by-step guide below for a smooth and successful hanging process.

Step-by-step guide on how to hang artwork using picture rail hooks

Hanging artwork with picture rail hooks is a straightforward process that can be easily done by following these steps:

1. Measure and mark: Use a measuring tape and pencil to determine the desired height and spacing for each artwork. Mark the hanging points on the wall or picture rail.

2. Install the picture rail hooks: Depending on the type of hooks you’re using, follow the manufacturer’s instructions for installation. For traditional hooks, use a hammer to secure them onto the picture rail. For adhesive hooks, simply peel off the backing and press them firmly onto the picture rail.

3. Attach the wire or cord: Cut a piece of picture hanging wire or cord to the desired length, leaving some extra length for twisting and securing. Use pliers to twist the wire or cord onto the picture rail hooks. Make sure it is tightly secured to prevent any accidents or damage.

4. Check for level: Use a level to ensure that the artwork is hung straight and aligned. Adjust the height or position of the artwork if necessary. It’s also a good idea to step back and visually assess the arrangement to ensure that it looks balanced and visually appealing.

5. Hang the artwork: Carefully lift the artwork and hang it onto the wire or cord attached to the picture rail hooks. Adjust the positioning as needed. Step back and admire your beautifully hung artwork.

6. Repeat the process: Repeat the above steps for each piece of artwork you want to hang. Remember to measure and mark the desired hanging points, install the picture rail hooks, attach the wire or cord, check for level, and hang the artwork.

By following these steps, you can hang your artwork with ease and precision using picture rail hooks. The flexibility and versatility of these hooks allow you to create a customized and visually stunning art display that reflects your personal style and enhances the overall ambiance of your space.

Tips for arranging and displaying artwork with picture rail hooks

Now that you know how to hang artwork using picture rail hooks, let’s explore some tips and techniques for arranging and displaying your artwork:

1. Create a focal point: Choose one artwork as the focal point of the room and arrange the rest of the pieces around it. This will draw attention to the main artwork and create a visually appealing focal point.

2. Vary the sizes and heights: Experiment with different sizes and heights to create visual interest. Mix large and small artworks, and vary the heights at which they are hung. This will add depth and dimension to your art display.

3. Consider the room layout: Take into account the layout of the room when arranging your artwork. For example, if you have a long hallway, consider hanging a series of smaller artworks in a linear arrangement. If you have a large wall, opt for a statement piece or a gallery wall.

4. Group similar artworks: Group artworks with a similar theme, color palette, or style together. This will create a cohesive and harmonious look. You can also experiment with different arrangements, such as a grid layout or a salon-style arrangement.

5. Experiment with angles: Don’t be afraid to hang artwork at different angles or orientations. This can create a dynamic and visually interesting display. For example, try hanging a piece diagonally or overlapping two artworks.

6. Consider the lighting: Take into consideration the natural and artificial lighting in the room when arranging your artwork. Position pieces that are more reflective or have lighter colors in well-lit areas to enhance their visibility. Use spotlights or track lighting to highlight specific artworks.

7. Regularly update and rearrange: Don’t be afraid to change your art display over time. Update the artwork or rearrange the pieces to keep your space fresh and inspiring. Picture rail hooks make it easy to make changes without damaging your walls.

By following these tips, you can create a visually stunning and personalized art display that reflects your style and enhances the overall aesthetic of your space. Remember to have fun and be creative when arranging and displaying your artwork.

Creative and unique ways to use picture rail hooks in your home

Picture rail hooks are not just limited to hanging artwork. They can be used in a variety of creative and unique ways to enhance the functionality and aesthetic appeal of your home. Here are some ideas to inspire you:

1. Hanging plants: Use picture rail hooks to hang potted plants or create a vertical garden. This adds a touch of greenery to your space and brings the outdoors inside. Make sure to choose plants that are suitable for indoor environments and consider the weight capacity of the hooks.

2. Floating shelves: Install picture rail hooks along a wall and use them to support floating shelves. This creates additional storage or display space for books, decorative items, or personal mementos. Floating shelves can be easily rearranged or removed without leaving any marks on the wall.

3. Curtain rods: Picture rail hooks can also be used to hang curtain rods. This is particularly useful if you have high ceilings or want to create a dramatic effect with floor-to-ceiling curtains. Simply attach the hooks to the picture rail and hang the curtain rods from them.

4. Children’s artwork display: Create a dedicated space for displaying your children’s artwork using picture rail hooks. Hang their masterpieces using clips or clothespins attached to the hooks. This allows you to easily change and update the display as new artwork is created.

5. Jewelry organization: Attach picture rail hooks to the inside of a closet or on a bedroom wall to create a stylish and functional jewelry organization system. Hang necklaces, bracelets, and earrings from the hooks for easy access and tangle-free storage.

6. Kitchen utensils: Use picture rail hooks to hang kitchen utensils or pots and pans. This frees up valuable drawer and cabinet space and adds a decorative touch to your kitchen. Consider using hooks with a higher weight capacity for heavier items.

7. Holiday decorations: Hang festive decorations.

What is a hanging system

Hanging Systems


Introduction To Hanging Systems

Hanging systems have become an increasingly popular choice for displaying artwork, photographs, and other decorative items in both residential and commercial settings. These systems consist of a series of wires suspended from a track or rail, allowing for flexible and convenient hanging options. Unlike traditional picture hooks or nails, hanging systems offer versatility in terms of positioning and rearranging artwork without causing damage to walls.

One of the key advantages is its ability to support multiple pieces of varying sizes and weights. With adjustable hooks or clamps along the wires, users can easily change the height or arrangement of their displayed items to suit their preferences. Additionally, these systems provide a clean and professional aesthetic by eliminating unsightly nail holes or visible hardware.

As we delve further into the world of hanging systems, we will explore their components, installation process, benefits, and various applications in both residential and commercial spaces.

Components of a hanging system

A hanging system is a versatile and efficient way to display artwork, photographs, or other decorative items. It consists of several key components that work together to create a secure and visually appealing display. Firstly, the anchor point is an essential part of the system. This can be a wall-mounted hook or track where the wires will attach. The anchor point provides stability and support for the entire system.

Next, stainless steel cables or nylon cords are used as the primary hanging wires. These durable materials ensure strength and longevity while allowing flexibility in adjusting the height of displayed items. To attach the cables or cords to the anchor point, specialized fittings such as hooks or clamps are used. These fittings securely fasten the wires while also allowing for easy adjustments.

Lastly, adjustable hooks or clips are attached to the hanging wires to hold and display individual artworks or frames.

What are the benefits

A hanging system is a versatile and practical solution for displaying artwork, pictures, or signage. Its advantages make it an ideal choice for both residential and commercial spaces. One key benefit is its flexibility; the adjustable wire allows for effortless repositioning or rearranging of displayed items without causing damage to walls. This system also offers a sleek and minimalist aesthetic, as the wire remains inconspicuous, allowing the focus to be on the artwork itself.

Furthermore, hanging systems are easy to install and require minimal maintenance. Additionally, they provide a secure and reliable way to hang heavier objects, ensuring that your valuable pieces are safe from accidental falls or damage. With their adaptability, aesthetic appeal, ease of use, and enhanced safety features, hanging wire systems offer an efficient and visually appealing solution for displaying artwork or other items in any setting.

How to Install a hanging system

Installing a system is a straightforward process that allows you to display artwork, photographs, or other decorative items on your walls. To begin, gather the necessary materials including wire, hooks, and wall anchors. Measure the desired height at which you want your artwork to hang and mark the spots on the wall accordingly. Use a drill to create pilot holes for the wall anchors and insert them securely into place.

Next, attach hooks onto the wall anchors or directly onto the wall if it is sturdy enough. Cut a length of wire slightly longer than the distance between your hooks and thread it through each one, making sure it is taut but not overly tight. Finally, loop each end of the wire around itself and secure it tightly using pliers. Once completed, hang your artwork onto the system by placing it over both wires evenly spaced apart for stability and balance.

What are the applications

Hanging systems find widespread use in various industries and settings due to their versatility and practicality. One prominent application is in the field of art galleries and museums, where these systems provide an efficient method for suspending artwork securely. By using adjustable hooks or clips along the wire, curators can easily reposition or replace artwork without damaging the walls. Another key application is in retail spaces, where they are used to showcase merchandise effectively.

These systems allow retailers to create visually appealing displays by suspending products such as clothing, accessories, or electronics. The flexibility of the wires enables easy rearrangement of items, ensuring that each product receives optimal visibility. Furthermore, hanging systems are widely utilised in office environments for organising and displaying important documents or notices. By attaching files or boards to the wires, employees can keep their workspaces tidy while also ensuring that information is readily accessible.

Maintenance and safety considerations

Proper maintenance and adherence to safety protocols are crucial for the effective functioning and longevity. Regular inspection is essential to identify any signs of wear or damage in the wires, hooks, or other components. This includes checking for corrosion, fraying, or loose connections. If any issues are detected, immediate repairs or replacements should be carried out by trained professionals.

Safety considerations encompass both the installation and use of hanging systems. It is vital to ensure that the wires are securely fastened to appropriate anchor points capable of supporting the intended load. Additionally, proper weight distribution across multiple wires should be maintained to avoid undue strain on individual components. Regular user training is essential to promote safe handling practices when adjusting or moving objects suspended from these systems.

Users must be aware of weight limitations and instructed on how to distribute loads evenly along the wires.

Choosing the right system for your needs

In conclusion, choosing the right hanging system for your needs is crucial to ensure optimal functionality and aesthetics in displaying artworks or other objects. The selection process should involve careful consideration of several factors. Firstly, assess the weight and size of the items you intend to hang, as this will determine the strength and durability required from the hanging wire system.

Additionally, consider the type of wall or surface where you plan to install it, whether it is drywall, concrete, or another material. This will influence the choice of installation method and hardware needed. Furthermore, take into account your personal preferences regarding visibility and adjustability options. By carefully evaluating these aspects and consulting with professionals if necessary, you can confidently select a hanging wire system that perfectly suits your specific needs while ensuring safety and enhancing the overall visual appeal of your space.

Why Galleries Choose Hanging Systems for Art Displays


When it comes to displaying art in galleries, hanging systems have become the preferred choice. These systems offer numerous benefits and play a crucial role in enhancing the overall presentation of artwork. In this article, we will explore the reasons behind the popularity of hanging systems in galleries and how they contribute to creating a visually appealing and professional display.

Versatility and Flexibility

Hanging systems allow galleries to easily rearrange and reposition artwork without damaging walls or creating unsightly holes. This flexibility allows for a dynamic and ever-changing display.

One of the main reasons why galleries choose hanging systems for art displays is the versatility and flexibility they offer. Traditional methods of hanging artwork often involve drilling holes into walls or using nails and hooks, which can be damaging and leave unsightly marks. Hanging systems, on the other hand, provide a non-invasive solution that allows galleries to easily rearrange and reposition artwork without causing any damage.

Freedom to experiment

With hanging systems, artwork can be easily moved, adjusted, or replaced, allowing for a dynamic and ever-changing display. This flexibility is particularly beneficial for galleries that frequently rotate their collections or host temporary exhibitions. It gives curators the freedom to experiment with different layouts and arrangements, creating a fresh and engaging experience for visitors.

Furthermore, hanging systems also offer the advantage of being able to support various types of artwork, regardless of size, weight, or shape. They typically consist of tracks or rails that are mounted on the walls or ceilings, along with adjustable hooks or cables that can be attached to the artwork. This adaptability allows galleries to showcase a diverse range of pieces, from small paintings to large sculptures, without the need for additional hardware or complicated installation processes.

Overall, the versatility and flexibility provided by hanging systems make them an ideal choice for galleries looking to create visually appealing and professional art displays. They offer a practical and efficient solution that not only enhances the presentation of artwork but also simplifies the process of curating and organizing exhibitions.

Easy maintenance and preservation of artwork

In addition to their versatility and flexibility, hanging systems also offer galleries the advantage of easy maintenance and preservation of artwork. Traditional hanging methods often require frequent adjustments and repositioning, which can increase the risk of damage to the artwork. With hanging systems, however, artwork can be securely and safely hung in place, reducing the need for constant handling and minimizing the potential for accidents or mishaps.

Hanging systems also provide galleries with the ability to create a visually appealing and cohesive display. The adjustable hooks and cables allow for precise positioning of artwork, ensuring that each piece is showcased in the best possible way. This level of control and precision is especially important when curating exhibitions or showcasing specific collections.

No nails and screws

Hanging systems offer a level of versatility that traditional hanging methods cannot match. With a hanging system, galleries can easily rearrange and reposition artwork without the need for nails or screws, which can damage walls and create unsightly holes. This flexibility allows for a dynamic and ever-changing display, keeping the gallery space fresh and engaging for visitors.

In addition, hanging systems offer a clean and professional look. Instead of using traditional nails or hooks, which can leave marks or damage walls, galleries can use discreet and sleek hanging systems that blend seamlessly with the overall aesthetic of the space. This allows the artwork to take center stage without any distractions.